
|
Literably can literally save you time and provide valuable information on your young readers’ fluency and comprehension as you work to support literacy in the classroom. Literably offers a free teacher account with up to ten free student accounts. Doing individual periodic checks for young readers’ fluency is a necessary but often time-consuming task, but Literably can simplify the process by allowing students to record themselves reading an assigned, leveled passage and then submit a timed recording when done. Literably then grades the recording for you, marking errors and doing the calculations for correct words per minute. Teachers (and even parents) can always access those recordings to listen to, in addition to viewing the graded hard copy and statistics. In addition, students can also do a comprehension check on the same passage. 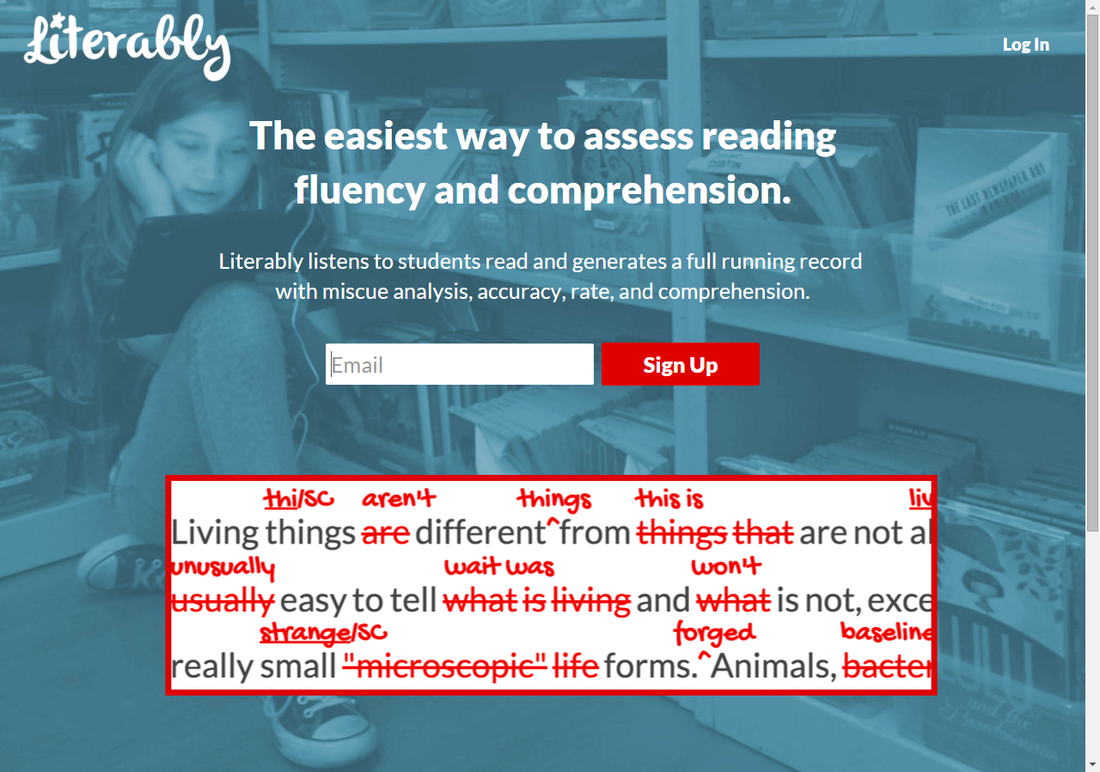 First students log in by selecting the “I’m a Student” option. The username should be the teacher’s username, as the drop down menu then populates with the teacher’s roster. 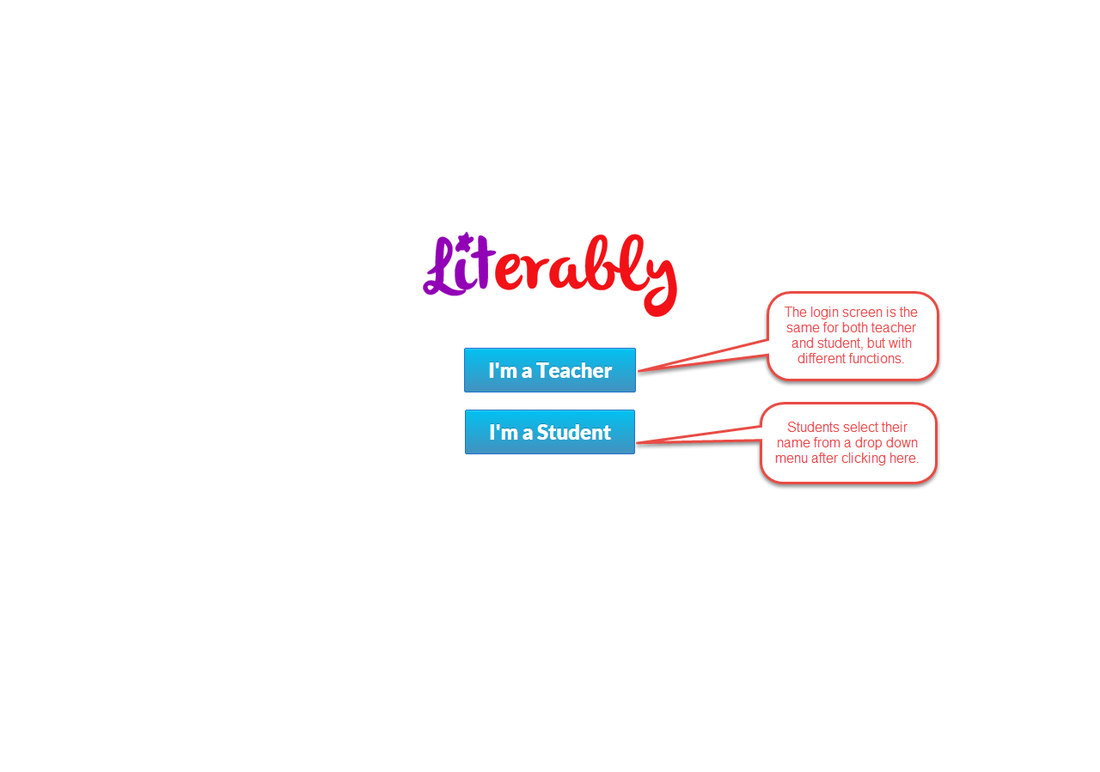 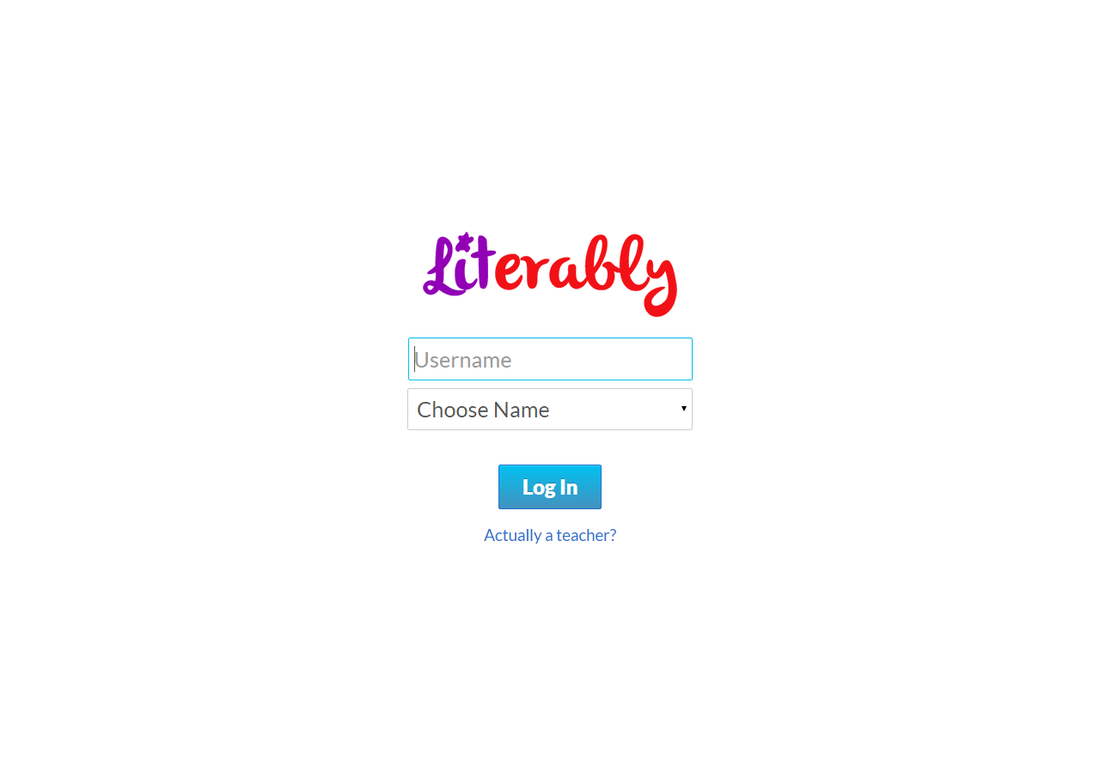 There is no student password required. After selecting the correct name, students click “Log In.” The teacher-assigned leveled passage will load, they will be asked to “allow” the microphone, and then they can click “start” when they are ready to record. 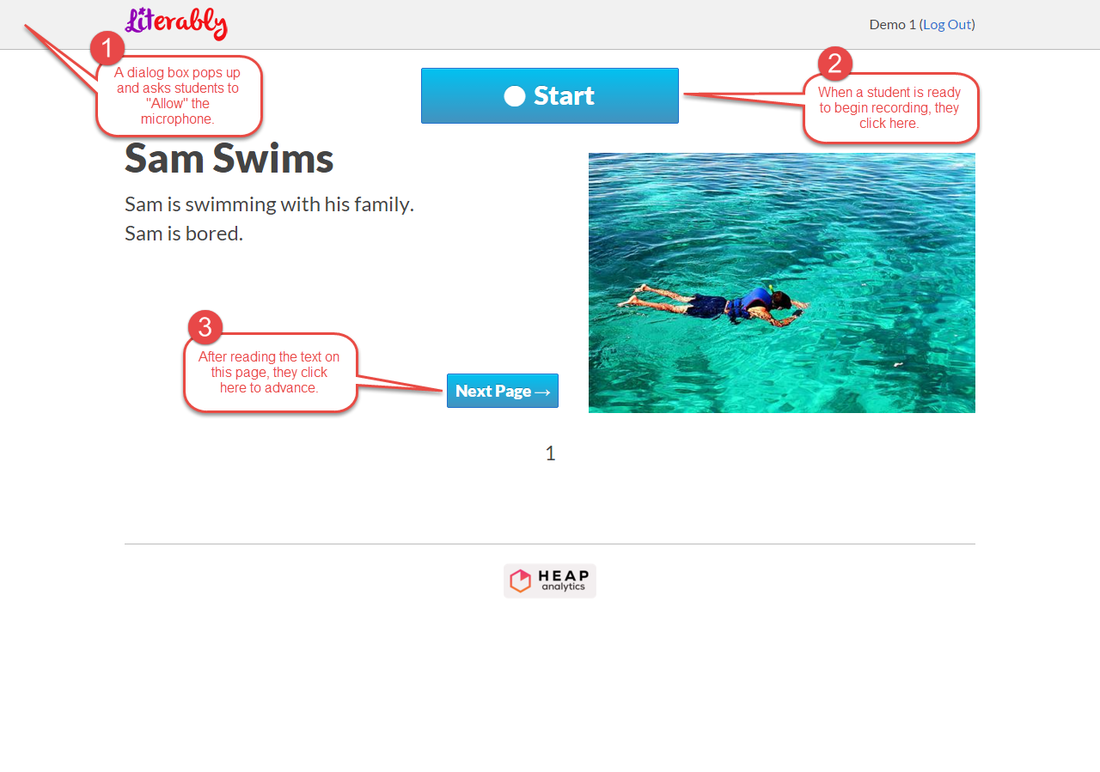 It is a one-minute recording, so if a student takes longer than a minute they will receive the following message: 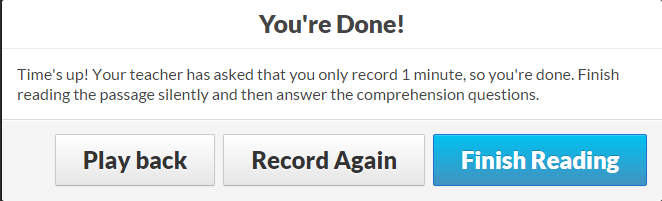 Students have three options. If they choose to finish reading, it will help with the comprehension check as well. 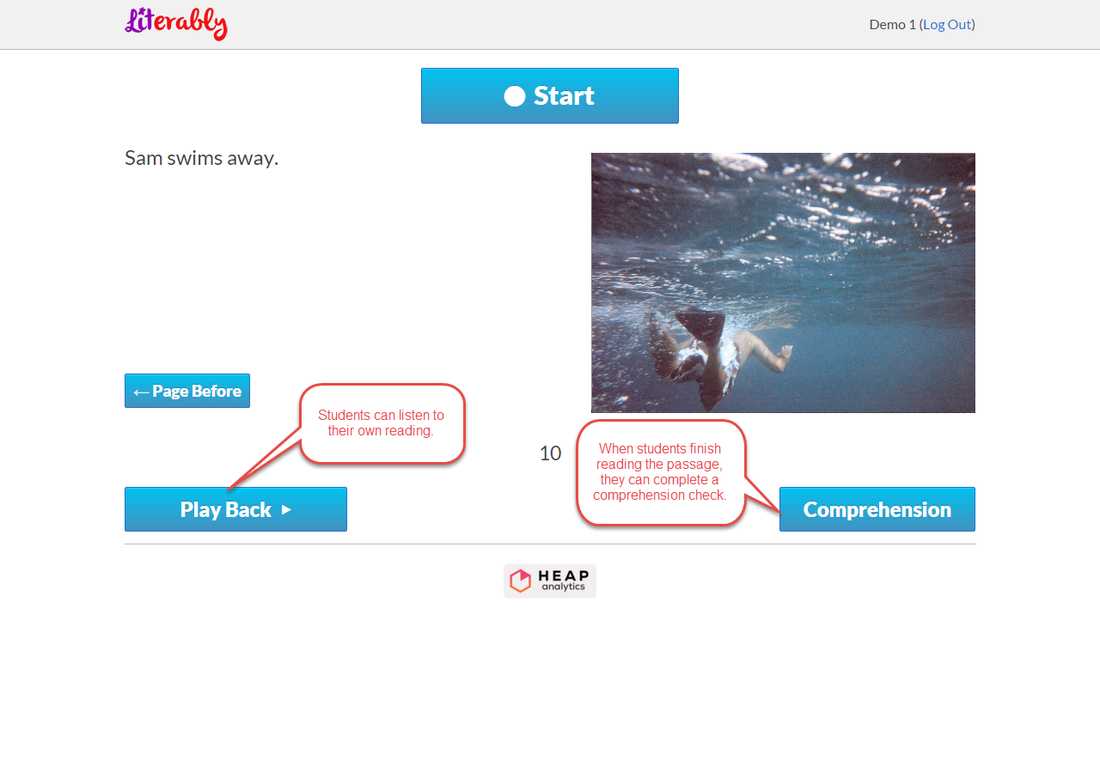 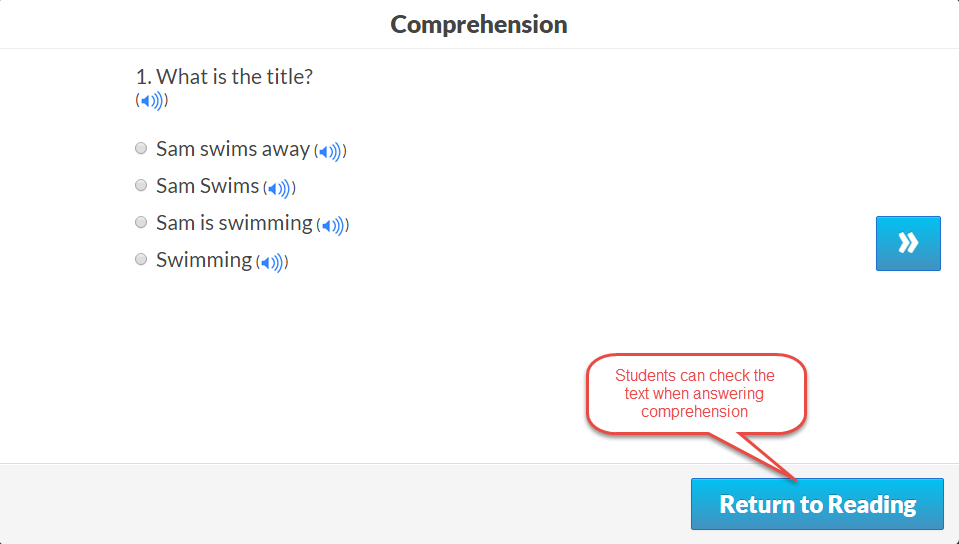 The last comprehension check is a retelling, which can be recorded for those younger students without sufficient keyboarding skills. 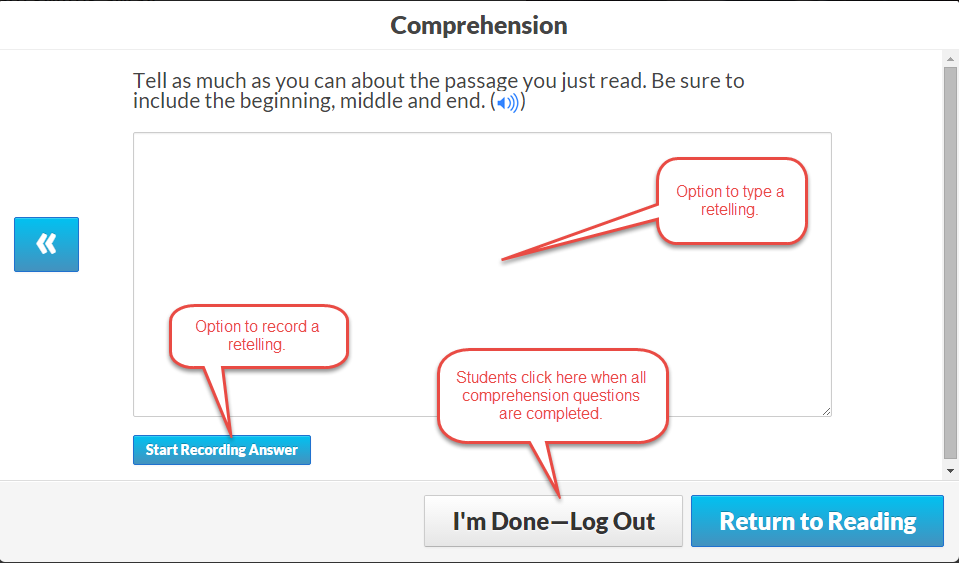 Students are now finished with their fluency and comprehension check. While the grading is not real time, it is usually completed within the hour. From the teacher’s dashboard, the students are listed with their assigned levels and most recent data. If students attempt to record again, it will only save the most recent attempt. 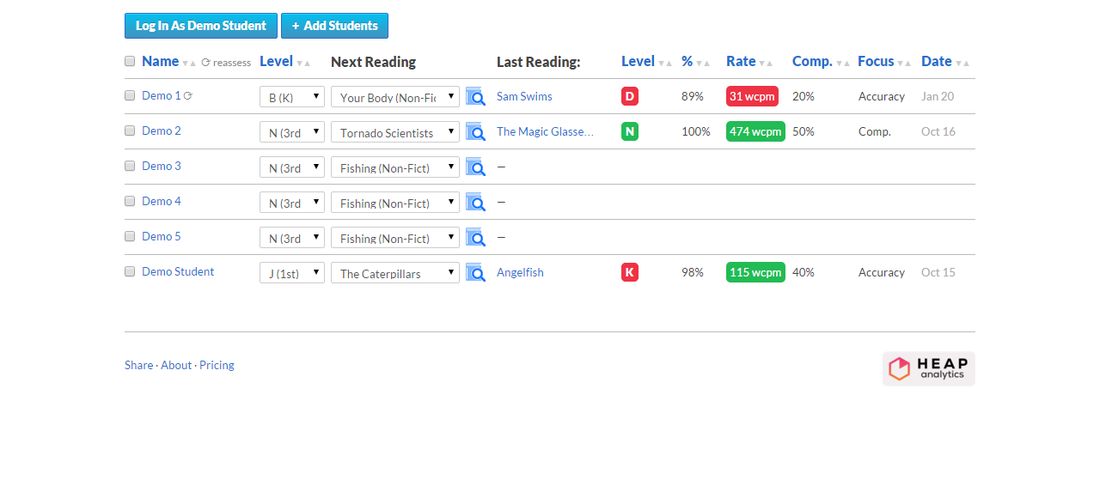 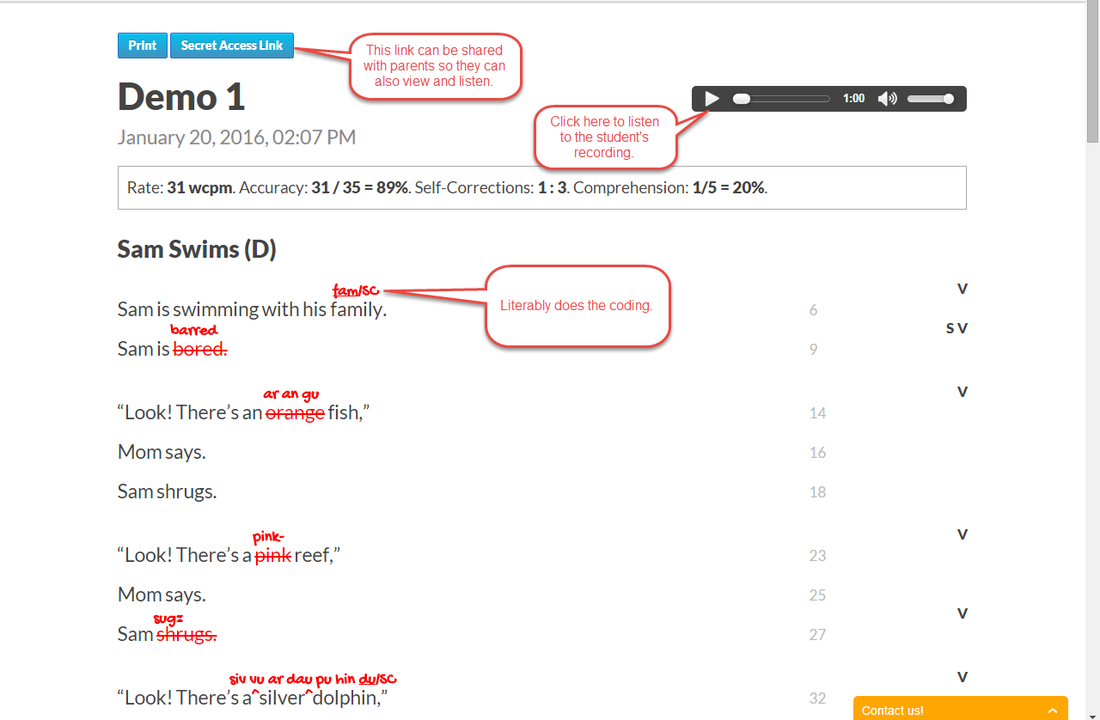 Literably could be a great tool to streamline your literacy instruction with formative assessment done for you!
0 Comments
There are options for accessing informational text online, and current events offer relevant text through a website called Newsela.com. This Web 2.0 option not only publishes current event articles, it takes these articles one step further with Lexile levels, giving teachers the opportunity to use the same topic and present a differentiated reading level for all students. For instance, here is a snapshot from yesterday’s headlines… 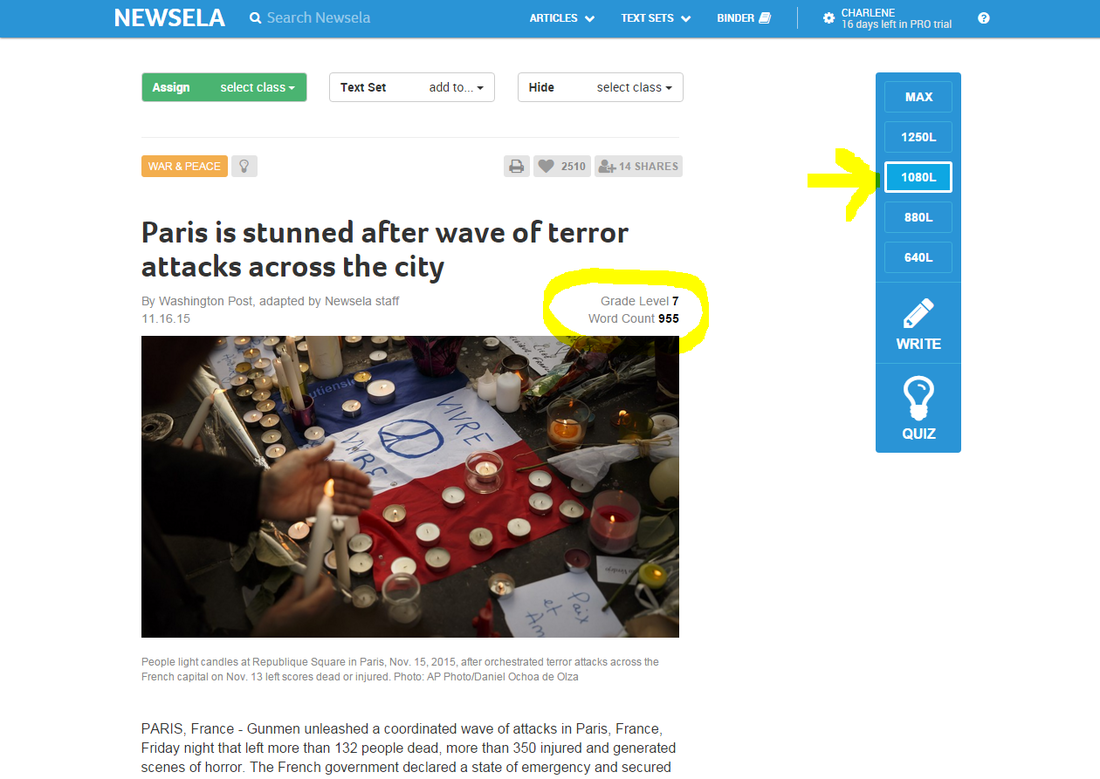 There are a couple features to notice when navigating Newsela. First, the Lexile ranges are adjustable, even though the topic/headline will remain the same. In the above snapshot, the Lexile level is set at 1080, which correlates to a 7th grade reading level and a word count of 955. However, in the snapshot below, the Lexile level is set at 640, which correlates to a 3rd grade level and a word count of 495. You can also compare the complexity of the text in the first paragraph. 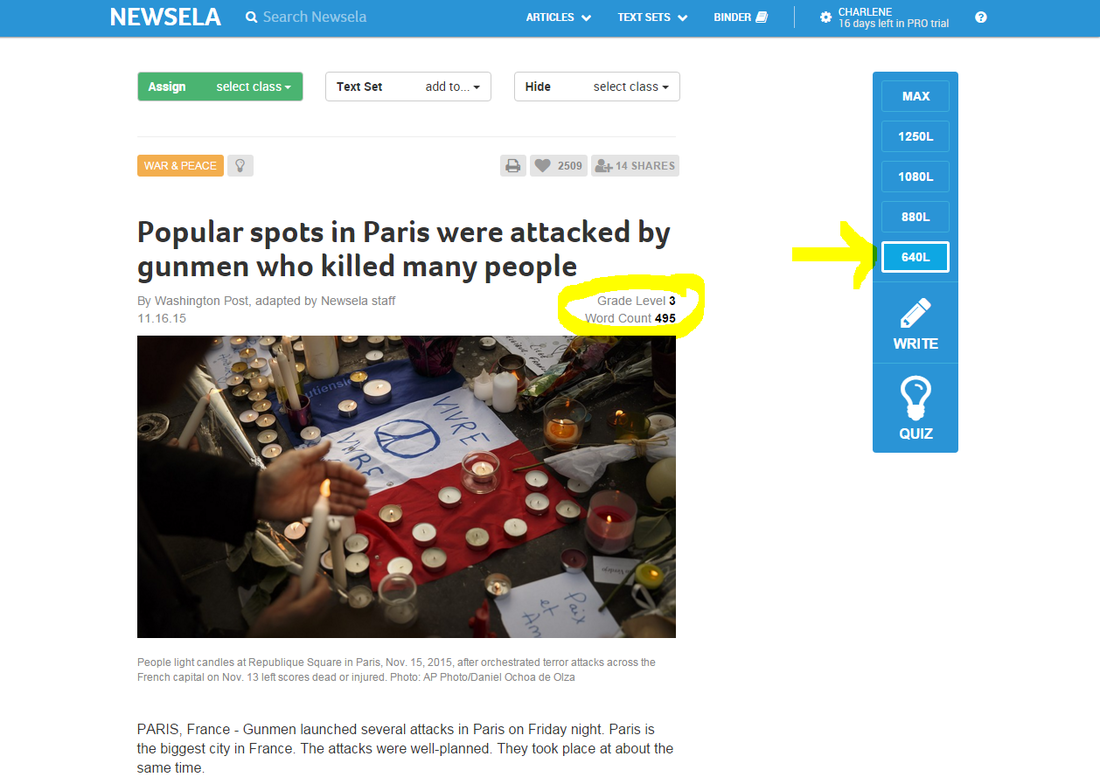 However, when students log in, they will only see the word count (see example below). 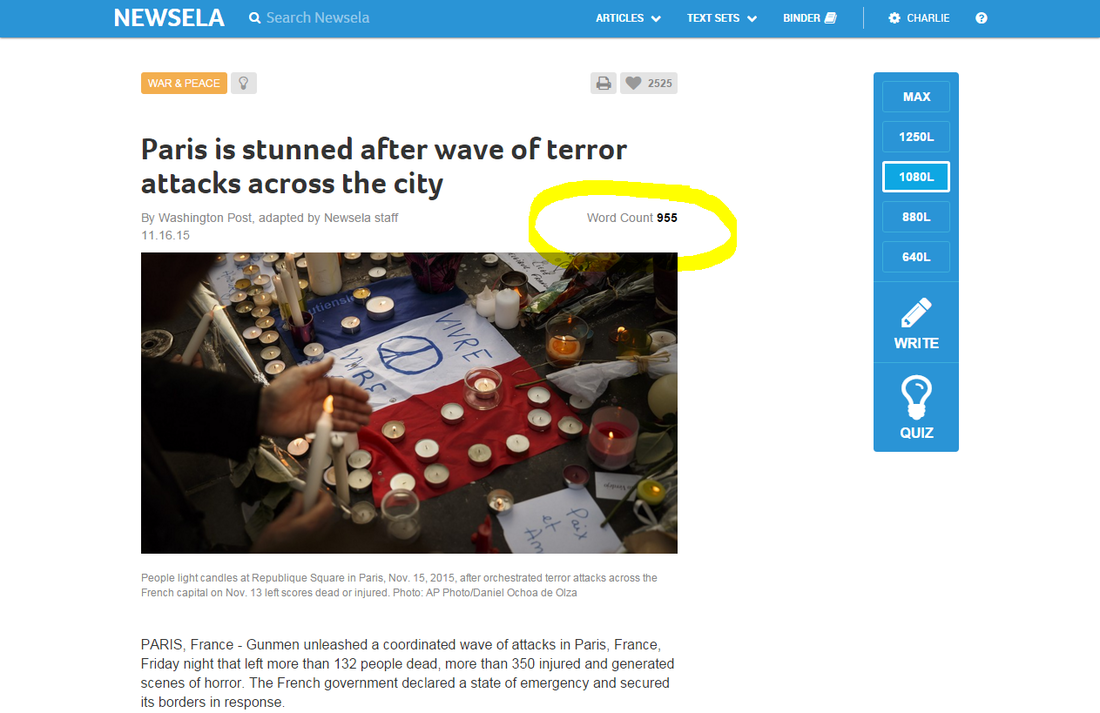 In addition to the ability to manipulate the Lexile levels, there are writing prompts and comprehension quizzes for each level as well. 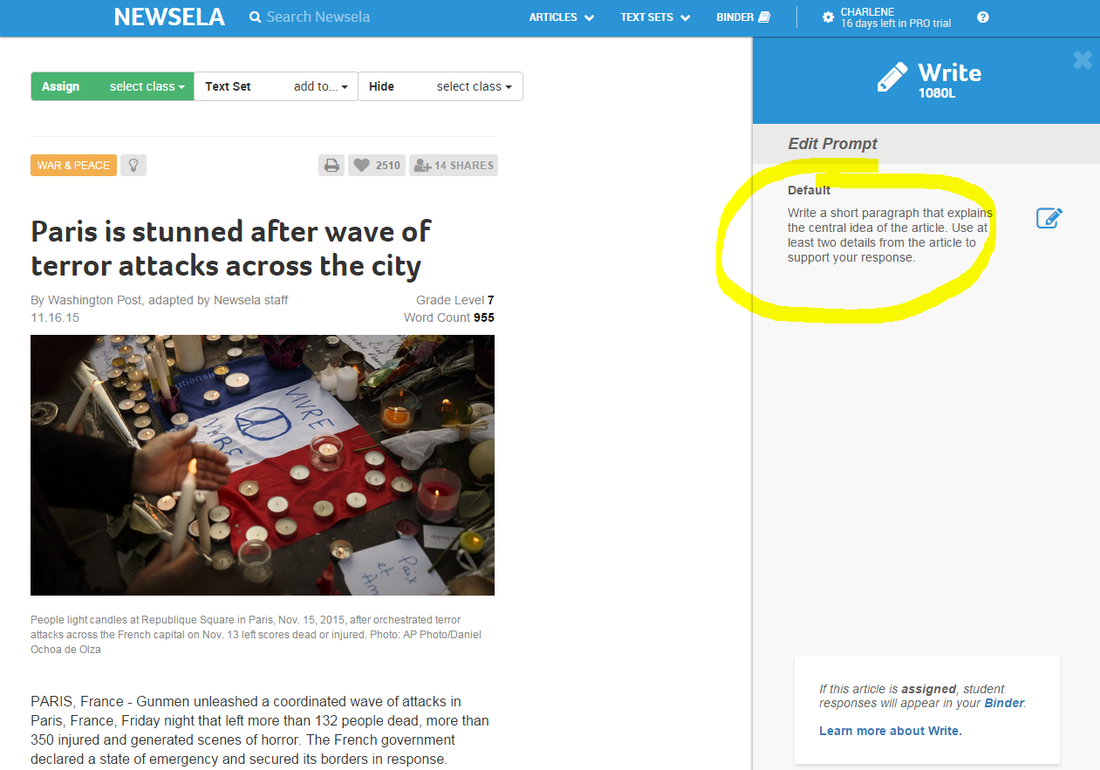 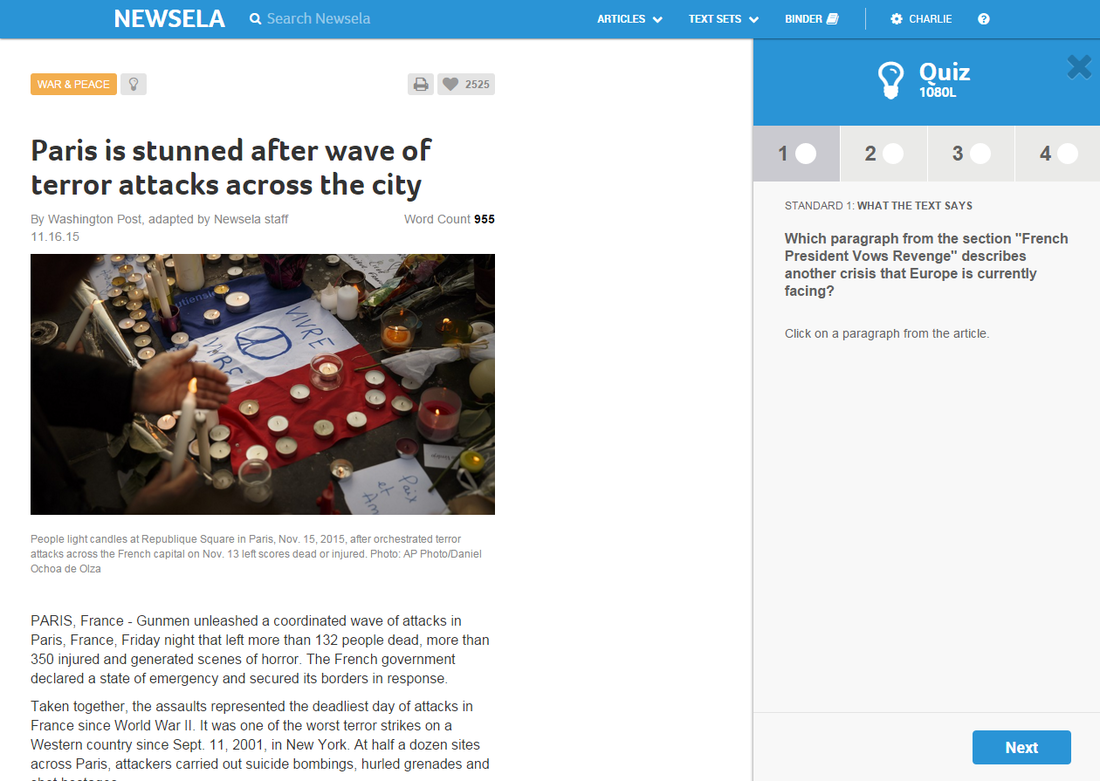 Students receive instant feedback when the quiz is complete, including the option to review. The article is still displayed for students to reference.
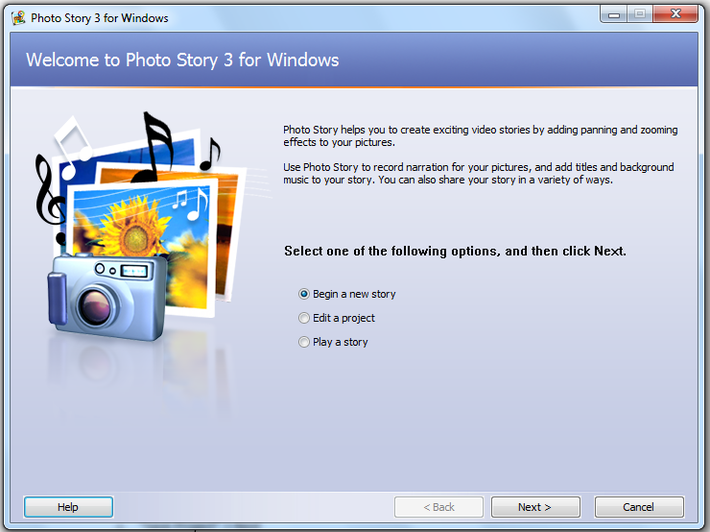
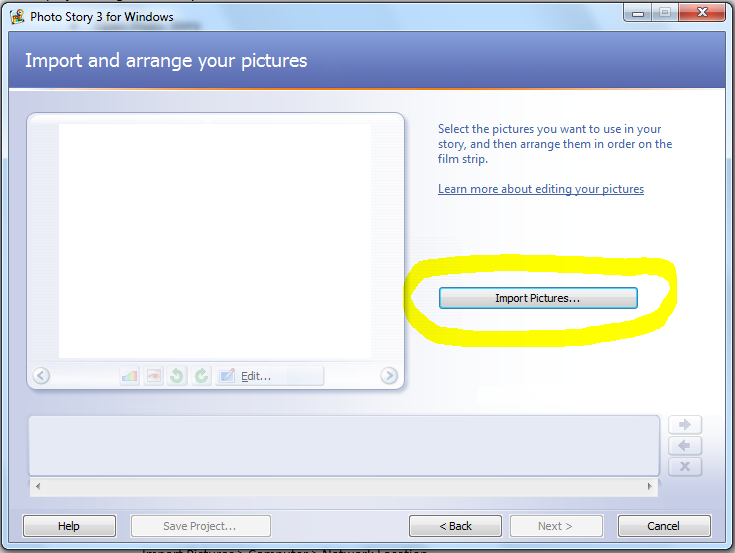
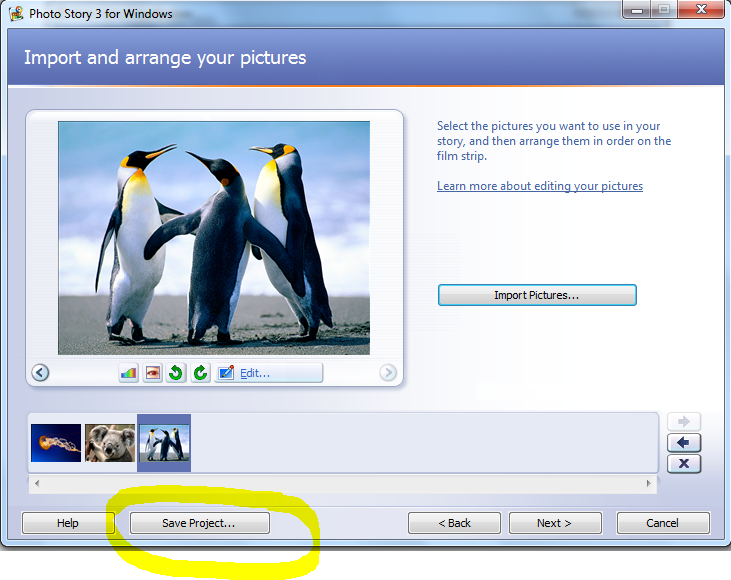
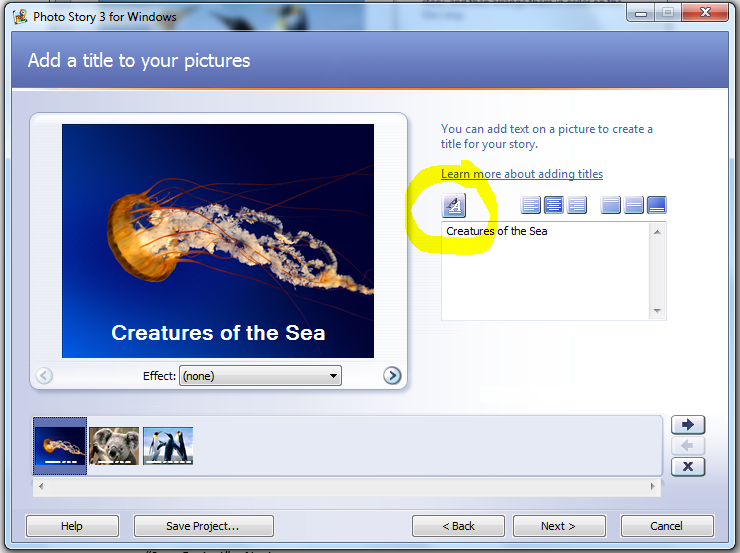
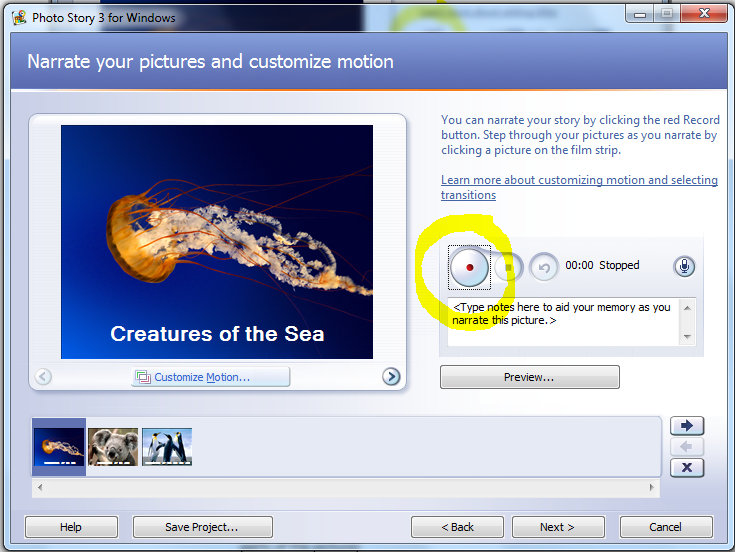
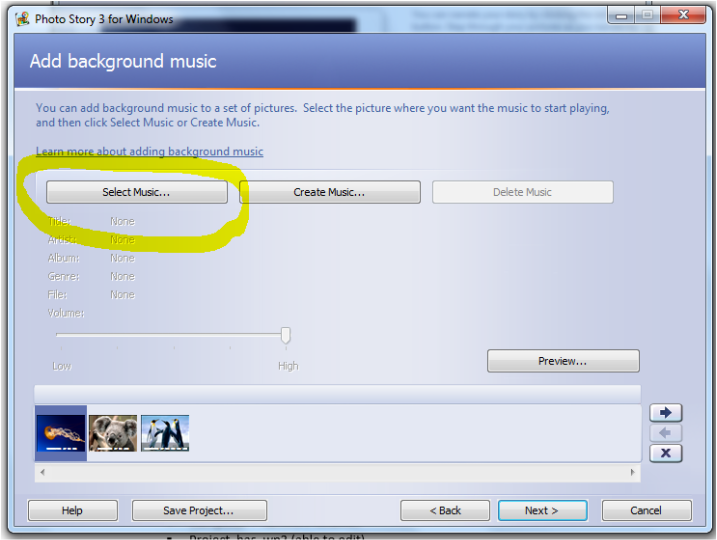
There are many more ways to use Newsela, and it is a worthwhile site to investigate and implement with students. It has already been approved by the district for use, so please feel free to contact me for additional lesson planning support. Digital storytelling is one way to expand a student’s ability to share their thinking about any given topic. There are a variety of tools available, but sometimes it is best to begin with the basics. Even young students need the opportunity to demonstrate their ability to communicate, create, and critically think about their understandings. Photo Story 3 for Windows is readily available as a free download, either from the Internet, or in our school district, from our network. It can be used to incorporate photos, text, narration, and music to produce a Windows Media Video (.wmv) file for playback. Following are the basic steps to completing a project using Photo Story. If this is a student project you are interested in, please contact me to set up a planning session and we can work together to design a project that gives your students an opportunity to demonstrate their learning using 21st Century skills.
One of the advantages to being the “big kids” when students enter fifth and sixth grade is they now have access to personal space for their technology-based work. If you have ever worked with students on a Word document or a PowerPoint presentation and had them save their work to “Student Work/File” only to have their work changed, moved, or worst case scenario, deleted, you can understand the relief and gratitude from both students and teachers to know there is a safe and personal place to save their hard work. And the best part is, teachers still have access to students’ work!
They actually have several options with what we call “Active Directory” logins (AD logins), to include Z drive space on our GFPS servers, Google Drive (aka Google Apps for Education or GAFE), Office 365, and then the additional option for Moodle, an online learning management system. In order for students to gain access to these options, they must first log in to a school computer to activate their login credentials. I have a process and an AD login card template I am happy to model and/or share with you to walk students through that process. Once students have activated their login credentials through the school computer, they can save to their Z drive space in the same way teachers can. They log in to computers as themselves, and when ready to save, they go to File > Save as > select “Computer” on the left side of the dialog box, and then double click their Z drive space listed under “Network Location.” Students use those same credentials for logging into Google Drive and Moodle. Office 365 is a little different, in that it goes outside our servers and requires a full email to log in. However, students have a faux email account, faux meaning they cannot send or receive emails with it, but they can use it to access Office 365. These various options will offer many project-based learning opportunities for your students. I am available to begin this process with you and support you and your students with any and all support needed. Don’t hesitate to call. Have you ever done something backward and only realized it after things started to not work the way you thought they should have? Welcome to my world…I searched for a poster-making website for students that didn't require a student email for logging in, found a website that seemed engaging and user-friendly, and began making sample posters only to discover that some of my image searches within the website were yielding results ranging from not-so-academic to absolutely-not-appropriate! Only then did I realize that I was missing a step or two in my quest for a cool Web 2.0 tool.
COPPA, CIPA, and FERPA represent the student protection laws which teachers must uphold, but so many of us don’t understand the implications of what that means, particularly when using Web 2.0 tools (any website-based project on the Internet). So how do teachers navigate this world of legality? The first step to ensuring that a website being used complies with these student protection acts is to simply search “terms of use” for that website. This search will readily yield an answer of whether it is a tool meant for students under the age of 13 with a quick scan of those terms. In my example above, I was misled by a generic student login button, assuming (incorrectly, by the way) that it would be student-friendly. Had I searched first for terms of use, I would have known beforehand that it was a site meant for a 13 years and older crowd. Many sites can still be used with parental permission, but that makes it imperative to have permission or the use of that website with students means noncompliance with the law. While convenience suggests we send out a generic permission slip at the beginning of the school year asking parents for their blessing of any and all sites we should happen upon throughout the year, the law dictates that we garner permission for each specific website. Click here for a sample permission slip. Multiple websites can be listed on one permission slip, but permission slips must be specific (“We will be using Piktochart”) rather than general (“We will be using Web 2.0 tools”). Often “terms of use” and “privacy policy” are interchangeable, but to make sure that all bases are covered, it helps to search both. This gets a little trickier to navigate, but essentially we as educators have to protect student identifying information, and as a result, need to be aware of what information a specific website collects, as a third party. Any data collection and/or identifying information needs to be considered carefully when allowing students to use a website for learning. My rule of thumb is for students to never to post more than a first name when using Web 2.0 tools, and ideally, a username or nickname. I’m not a lawyer, I’m an educator. However, as a responsible educator and a digital citizen, I need to ensure that my search for a fabulous Web 2.0 tool meets with the letter of the law. These steps of searching “terms of use,” “privacy policy,” and using a specific permission slip when needed will help ensure that I’m headed in the right direction. Since working backward is a more difficult way of learning, I'm learning to start with first steps first! Using Google to search for images to include in projects is considered a relatively simple task for students. However, ensuring that students have permissions to use any given image and give credit to the “owner” of that image can seem a little more daunting. Thankfully, Google has a method to make this task more user-friendly and with a few clicks, students can ensure that their searches are demonstrating digital citizenship in their use of images from the Internet. Google has the option to refine your searches to include images that have granted permission for reuse. After clicking on the images tab, click “Search tools.” Several options appear but we’re interested in the “Usage rights.”  Using the “Usage rights” dropdown menu, select options that give permission for “reuse.” This will refine a search to images that are granting permission to be used. The next step in selecting and saving images is for students to give credit to who actually “owns” the image. After clicking on an image, right-click on the image and select “Save image as…” and select the location for saving the image. Then right-click on the image a second time and select “Copy image URL.” SIDE NOTE: Point out to students that the “Related images” are not necessarily part of the refined search for images labeled for reuse, so they should only use images from the actual search to ensure they have permissions. 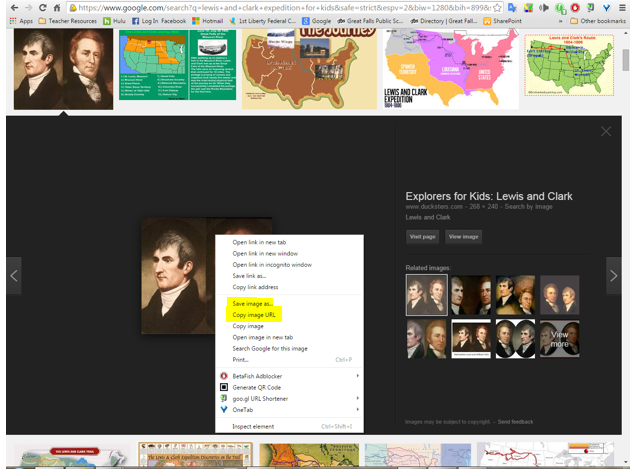 Using a Word document, students can then create a source document in which they right-click and paste the URL as an introductory way of learning to cite sources for their images. SIDE NOTE: Be sure students hit “Enter” after each URL to ensure that they do not connect one URL to another, creating a long inaccurate URL. 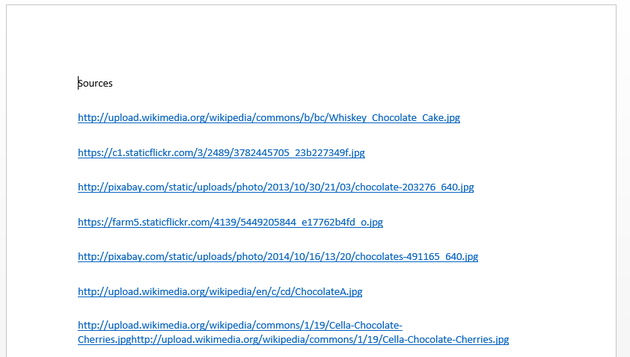 One element of digital citizenship is digital law, and we can teach this concept to students at a very early age with a discussion of “Does it belong to you?” and follow up with what we do to use something that does not belong to us: we ask for permission to use it and we tell others who we borrowed it from. As students are introduced to more formal methods of citation, the foundational ideas of copyright and crediting sources are laid out with this simple strategy.
It's funny how I have become such a creature of habit and have to force myself out of my comfort zone to try something new. When reflecting on how this came to be, I realized there has been a progression I've gone through for certain behaviors to become a habit. This progression is directly related to my philosophy regarding technology. When a particular tech tool achieves the status of my "go-to" technology, it's become an instructional habit, so to speak.
So which tools are my "go-to" technology and therefore my instructional habits? To understand where I'm headed, I want to reflect back to my experiences as a classroom teacher in first and second grades. My first "go-to" tech tool was PowerPoint, which helped to organize my instruction. It was a tool that I practiced with in a variety of subject areas, and as I became proficient at designing and implementing instruction with PowerPoint in conjunction with my SmartBoard, my instruction became efficient and virtually seamless because I could incorporate my learning objectives. thinking prompts, and visual aids. Students had a structure that allowed them to know what to expect while also offering some variations in the content (such as videos and website links) and the tasks assigned to them. Once this tool became an instructional habit (when I felt I had achieved efficiency), I was able to naturally progress to Smart Notebook, a program that had similar design features to PowerPoint, but with the added element of manipulation of items within the slideshow, thus increasing student engagement. This was when my thinking had begun to shift towards offering more student use of technology, rather than strictly instructional technology for me as the teacher. My first truly student-oriented technology project was the user-friendly PhotoStory as a production tool for writing. When beginning to consider the orchestration of a student-produced project, it can be overwhelming to identify all the details necessary to ensure success. Again, this is where I had to lay down my perfectionistic tendencies and remind myself that it takes practice to lead to proficiency. I highly recommend practicing without students and conducting a task analysis of the different components required to put a project together. The task analysis helps to determine which pieces need more scaffolding than others as I support students towards independence with the tool, but as every classroom teacher knows, there is always going to be that one student who presents an unanticipated challenge. Chalk it up to a learning opportunity and add it to the "anticipated" for the next time, because there needs to a be a next time or the progression from practice to proficiency to efficiency (instructional habits and tools) will never be achieved. Since beginning my position as a tech coach, which happened to coincide with the impact of Common Core standards in my district, I have been exploring a myriad of tools in order to expand my understanding of their implications and possibilities, both for teachers and students. My journey into instructional technology has relied on practice leading to proficiency, and then ultimately, efficiency with the tech tool placed it firmly as an instructional habit. With more emphasis on student technology projects and opportunities for collaboration, I have to remember that pushing myself out of my comfort zone will help me form new habits worth the investment of time and effort. Technology is just like any other set of skills. It takes practice to become proficient, but once proficiency is achieved, efficiency follows. When efficiency is in effect, productivity increases. In using technology with students, they have to have opportunities to use technology to develop some proficient skills with it. Once they become proficient, they can then efficiently expedite the learning process. Now students can produce work that helps reflect their learning. I have a strong work ethic that became a mantra in my classroom with the phrase “Be productive.” Efficient productivity was and is always my goal, and that’s why I personally prefer using technology because I find it is more efficient in accomplishing what I need to get done.
Choosing your technology tools wisely will decrease the tendency for the technology to be distracting and increase efficiency in their work.The latest and greatest tech tool may not be instructionally sound if it becomes a distraction to the students. Initially an introduction to a new tool can be a distraction to students, so allow time for students to familiarize themselves to the tool. Then bring the focus back to the learning objective, much the same way you do when introducing new math manipulatives or science materials. Sometimes the KISS principle still works when it comes to technology (Keep It Simple Silly). Technology is moving at the speed of light; it quickly becomes outdated as the latest and greatest is already being updated as soon as it hits the shelf. However, if you have something that works well, it’s okay to continue to use it. Some of my suggestions listed on this website are going to use tools you already have, but hopefully you can look at them with a fresh perspective and apply some innovation to the way you use them. Also know yourself and know your students when choosing an instructional tech tool. Every classroom has a different structure that reflects the teacher’s personality. Choosing instructional tech tools is no different, although you may have to stretch yourself to incorporate technology in your teaching and students’ learning. Additionally, knowing your students will help you determine whether you want to attempt whole-group instruction or small-group instruction with the instructional tech tool. Finally teach the objective of the lesson separately from teaching the tool. This has a two-fold purpose. First, you want students to meet the learning objective without distractions. Secondly, students will comprehend the task better when using the tool. Use a task analysis to break down how to teach students the steps in using the tool. This process will help instruction on the tool to be efficient and less confusing and also will help you determine which structure will be best suited for the tool, i.e. whole group versus small group. |
AuthorAs an instructional coach for technology, I get the pleasure of working with 1 preschool and 15 elementary schools to support integration of technology with classroom instruction. Archives
August 2020
Categories |
 RSS Feed