
|
You’ve heard the rumors, and you’ve seen the headlines...unfortunately, it is a reality that sometimes our students struggle to make good decisions when using the access given to them through the use of technology. With the ability to share and post with a click of a button, we have to make an intentional effort to teach digital citizenship and hold students accountable for their choices and behaviors online, particularly when using the district’s technology. Where can you start? There are several resources that have been made available for an instructional focus on digital citizenship.
These lesson plans include any relevant websites and student handouts, along with Common Core standards correlated to take an integrated approach when using these lessons. In addition, they also offer some online interactives to illustrate for students the challenges and best options when using technology in a game-like presentation.
Both of these resources offer parent resources to support conversations at home, which helps students understand that digital citizenship is a life skill and not necessarily specific to their learning environment.
If you do have a student who makes poor choices, there are options to temporarily restrict their access to digital resources like Google Drive, in keeping with the Student Acceptable Use And Internet Safety Agreement. All students indicated on their handbook receipts that they have read and agree to these guidelines, so if it becomes necessary to follow through, please feel free to contact me or our IT director. Being proactive is definitely more preferred than having to be reactive to students’ digital choices. If you’d like support in implementing instruction on digital citizenship, feel free to contact either your instructional or technology coach. We are happy to support your efforts in raising up outstanding citizens in all areas, including the digital realm.
0 Comments
 If you’re looking for a creative way to help students focus on the use of dialogue or figurative language in their writing, MakeBeliefsComix might be just the tech tool to engage students with this skill. This comic strip generator has a cast of characters, backgrounds, objects, and onomatopoeia word art choices that help students’ imaginations begin to creatively refine their writing skills. I’ve created a tutorial video and an example product from a sixth grade lesson on figurative language: 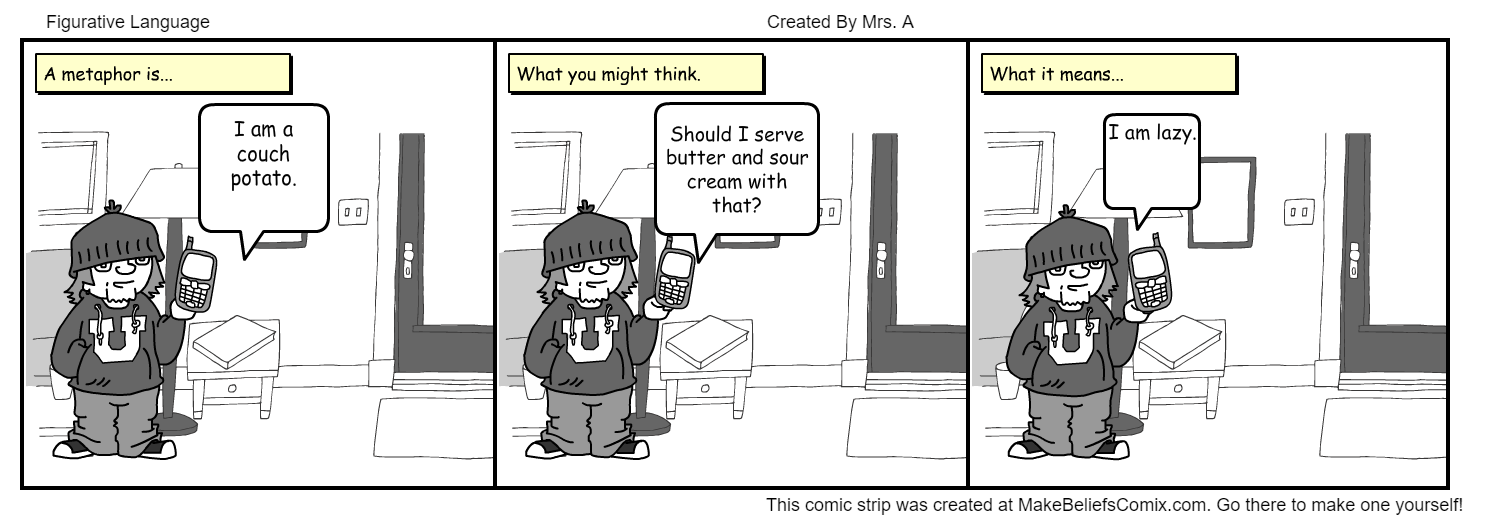 These resources are available for you to use. Be sure to connect with your instructional and/or technology coach for additional support in planning a lesson with this tool.
Great Falls Public Schools has been asked to participate in a survey that addresses the technology use in our district. After reviewing the proposal and its purpose, the Curriculum department felt the results of this survey would help document potential issues and needs not yet identified. This data will help to determine next steps with the current 5 year technology plan.
The proposal description provides an overview of the survey. This survey should take about 15 minutes to complete. We want your voice to be heard. So please participate. We so appreciate your input and willingness to help our district move forward with technology.  Everyone has their favorite websites they love to use with their students. There are so many options available out on the Internet these days, and new educational websites are being developed all the time. However, as educators in the world of instant access, we have to be mindful of what and how student information is being used on these websites. As a result, Great Falls Public Schools has developed the guidelines described below for using only District-reviewed and approved websites with students to ensure that we are complying with federal laws such as FERPA, CIPA, and COPPA.
Before using a website, first check the GFPS Approved Web 2.0 Tools/Apps/Software list. This list is organized in alphabetical order by website name. Each website on this list has been reviewed for its purpose, age restrictions, parent permission requirements, privacy certifications, and login requirements. In addition, the terms of use and privacy policy have been reviewed to determine:
If a preferred or desired website is not displayed on the list above, then there is a process for submitting that website for approval. Teachers are highly encouraged to read the terms of use and privacy policy of a new website before submitting their request. The Request for Software/App Review asks the teacher to provide information about the website and its intended use. This request form should be used for all applications, to include installed software on desktop computers, websites for any device, and apps or extensions for Chromebooks (and for those schools still using iPads). Once submitted, the technology integration coaches do a preliminary review and make a recommendation to the District Information Technology (IT) Director. The IT Director then does a more extensive review and makes a final decision, which is then emailed to the requesting teacher. If approved, the new site is added to the approved list for others to use as a resource as well. To get to these two resources for approved website use, begin at the District’s website, select Staff and then Technology Resources. Click the tab called Web 2.0 Tools, and with a click, you have access to these resources. Bookmarking the Approved List could also be beneficial for a quick reference when considering a new resource. Your instructional and technology coaches are always available to support your lesson planning with these approved tools to promote a successful experience with technology in the classroom Source: Digital Computer Science. (n.d.) Retrieved November 28, 2017 from https://pixabay.com/en/http-www-digital-computer-science-368146/
It might seem a little early to be talking about it, but it’s coming...Computer Science Education Week. And we want you to participate!
Why is computer science such a big deal? According to the U.S. Bureau of Labor Statistics, “computer and information technology occupations [are] projected to grow 13% from 2016-2026, faster than the average for all occupations…[adding] about 546,100 new jobs.” Oh, and did I mention that the median annual wage was $82,860 in May 2016, as compared to the median annual wage for all occupations at only $37,040? Our students’ present and future possibilities are heavily influenced by this realm of technology. We can engage students with computer science with a motivational, purposeful, and well-supported resource called Code.org. One of their original goals includes improving diversity in computer science (girls and minorities are underrepresented in this field), but they also aim to improve access to computer science by adding this subject to school district curriculum and setting up state policies to support computer science. Although this site can be used any time and throughout the school year, each year Code.org promotes computer science with one week of Hour of Code, as part of their campaign to improve access for all students. Teachers can sign up to participate in Code.org’s fifth annual international Hour of Code learning event, scheduled for December 4-10, 2017, and foster students’ enthusiasm for computer science. Check out this video from a prior event to see how much students enjoyed their experiences! They also have a how to get started guide, including (believe it or not!) hands-on activities that do not even use devices if computers are not readily available. Your instructional coaches and/or tech coach are able to support you in participating in this event or getting started beforehand with Code.org, so whether you have had any training or not, this is an event for every teacher and every student, kindergarten through twelfth grade. Let’s get coding! Sources 2016 Median Pay. (n.d.). Retrieved October 25, 2017, from https://www.bls.gov/ooh/computer-and-information-technology/home.htm About Us. (n.d.). Retrieved October 25, 2017, from https://code.org/about As the school year rolls on, there may be days when you are not in your classroom and need to prepare substitute teacher plans. While we want instruction to continue even when we’re not in the classroom, it can be challenging to determine what resources to leave for the guest teacher, especially digital resources such as PowerPoints, SMART Notebook files, PDFs, etc. In our district, we have at least two ways that digital resources can be shared with guest teachers without breaching security by sharing passwords.
First, classroom teachers need to know is that substitute teachers actually have their own logins for both the desktop computer and PowerSchool. It is not necessary, and strongly discouraged, for teachers to share their passwords. There are protocols in place for both guest teachers and long-term substitutes to provide them access to the necessary systems and applications. And in light of serious security breaches in other school districts, we all need to safeguard our usernames and passwords to prevent these kinds of threats. When writing your sub plans, then, instead of noting “The PowerPoint on my desktop…” simply refer them to one of the two following options to access digital files. The first option classroom teachers have to share digital resources is through AESOP, our online substitute reservation system. When completing or editing your reservation, you can attach files within the reservation. Video files might be too large, but most other file types will easily attach and be accessible to the guest teacher when accepting the reservation. This is most likely the easiest option for classroom and guest teachers alike. However, if you have larger file types such as a video prompt, then you will want to use the sub_material folder on our network. Every teacher and guest teacher has access to these folders, which are set up by school level (elementary, middle, and high school), and then by school, and lastly, by teacher. To get to these folders, in your Search, type \\disk\schools and hit enter. The sub_material folder is listed here. Double click your school level, double click your school, and then double click your name to open the folder. If your name does not appear, you have write permissions, so right-click, select New > Folder, and then name it. You can also right-click on your folder and select Send to > Desktop. This would allow you to always have a shortcut directly to this folder on your desktop, in order to click and drag digital resources. These two options provide your guest teachers with the access they need to digital resources without you having to share passwords, keeping your privacy and access secure. As always, your instructional coaches or I are available to support you if you would like a side-by-side guide in looking at these choices for setting up your guest teacher for success! It’s the start to a brand new school year, and brand new adventures are on the horizon! As we guide students on those adventures, we want to ensure they have the best experience possible. Putting safety parameters in place helps to make that experience a successful one, and this year, the district is moving to a more secure password protocol. Keep reading to find out how this will affect you! First, all elementary students will have their passwords reset to a default password (which is currently their 8-digit birthdate without punctuation and without spaces), including those students who have previously set up their own passwords in order to gain access to Google Drive. This will alleviate the management of trying to remember passwords from last year or tracking down the password cards from last year’s teacher(s). It will also make a more seamless experience to walk all students through the password set up, rather than attempting to figure out who does and does not need to set up passwords. Expect setting up passwords to be an annual process, as passwords will expire after one year. All third through sixth grade students will now have personal logins, so it will be important that these teachers schedule time in the computer labs to walk students through setting up their passwords for this year. Setting up passwords in order to gain access to Google Drive and/or Office 365 MUST be done on a computer in the lab, NOT on a Chromebook. Once passwords are set up on the computer in the lab, then students can successfully log on to Chromebooks and Google Drive. Second, there will be a new password protocol. One way to create a more secure password is to make it a complex one with a combination of UPPERCASE, lowercase, numeric and special characters. The new password protocol will require a combination of at least three of those options. For example, GFps1234 would meet this requirement because it has uppercase, lowercase, and numeric characters. You’ll also notice that this password example has the minimum requirement of eight characters. Lastly, the password CANNOT contain any part of the student’s name. New Password Protocol
I have active directory cards that can help teachers manage the password setup process and have a reference for students as they learn their new passwords. I find these cards extremely helpful for both teachers and students in simplifying the process. Please feel free to contact your instructional coach or myself if you need support with this process. P.S. As a last thought, this new password protocol will also apply to staff beginning in October. If you have not changed your password within the last year, you will be prompted to do so. And the new password will need to meet the complexity requirements listed above. As the year is winding down and you take a moment to breathe, celebrate the many successes of this school year! We, as a district, have made great strides with integrating technology with our core instruction, and hopefully, you are experiencing a more engaged, thought-provoking, problem solving classroom of students.
And after enjoying the sun and lots of fun this summer, consider taking some time to preview our newly published list of district-approved Web 2.0 tools before the next school year. This list identifies approved sites for classroom use, any corresponding age limits, and whether the site requires parental permission or not. This year has been a year of learning for many of us, as we learn how to responsibly comply with terms of use and privacy policies of the various sites available on the web. And while many sites offer fabulous resources, not all sites handle student data well, thus making us vulnerable to COPPA violations. If a site requires parent permission, then no matter how we de-identify students to protect their information, we must comply and send home a permission slip. The district has designed this permission slip so that you can list all the websites you intend to use for the school year on one page. Unfortunately, we cannot send home a general permission slip that covers all websites, but as long as each website that requires parent permission is listed, parents have been rightly informed. As you prepare for next year, take the time to preview some of the tools you think you will use, and then click the link for the permission slip. You will need to log in to your Google Drive, select File, and click “Make a copy.” You now have an editable copy of the permission slip. Anything in bold, italicized, and underlined print is yours to replace with your information. For more support, be sure to check out our Instructional Technology webpages. Start the 2017-18 year off with a customized and comprehensive list of the websites you want to use for fabulous project based learning opportunities and send it home on Day One. A few minutes of preplanning your year will make for a successful start in technology! Happy summer to you!  Citations are a big deal...but at elementary, do we really need to worry about it? Just as with any other concept we teach kids, giving credit where credit is due is a big deal! Ask any student who puts time and effort into a project if he/she would be willing to let someone else share the glory, and more than likely, he/she will answer with a firm no! And rightly so, as students should receive credit for their hard work. So how do we begin teaching students to cite? I would argue that while there are a variety of formats to choose from, at the elementary level, we should be less concerned with formatting and more focused on the big idea of teaching kids to acknowledge when they use the work of others to support their own ideas. Google Drive is constantly making improvements, and sometimes with success. When changing the “Research” function to the “Explore” tool, they initially removed the citation feature. Happily, they have brought it back, new and improved! Researching within Google Docs has become a useful process, with the citation tool built right into the search results. Click the Explore button in the bottom right corner and begin seeing results immediately. After using a source, students would hover over the website to see quotation marks appear. With a simple click of the button, students now have a footnote with a full, ready-made citation. 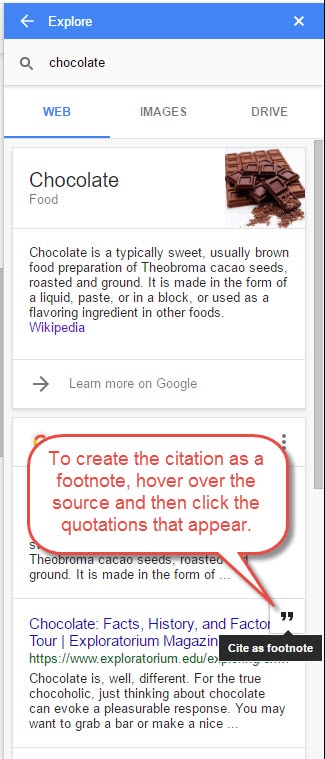 For example, here’s a citation for a quote regarding my favorite food: “Chocolate. There are few foods that people feel as passionate about-- a passion that goes beyond a love for the ‘sweetness’ of most candies or desserts…”  Citing images in Google Docs is a little trickier, but when using the Explore tool and selecting the tab for Images, students can click and drag an image right into his/her Google Doc, and it comes with the link to the website from which it belongs. Students at least have a web address to give credit in their list of sources.  Another option for inserting an image is to click on the image in the search results and enlarge it for a clearer view. Then with a click on the blue “Insert” button at the top, it is quickly inserted into the document. The website (and link) appears when the image is highlighted in the document itself. For example, here is the result of inserting my selected image:  As elementary teachers, we do have the responsibility of laying a firm foundation for students and their success in education, and thankfully, Google Docs has made citation very user-friendly.
 Having recently participated in Lesson Study with the fabulous teachers at Lewis & Clark, one common focus area in writing is teaching students how to cite text evidence. Not only does citing text evidence and sources create good writing habits, it is also assessed through both our writing assessments and SBAC testing. So let’s take a look at the expectations, the rubrics, and finally some resources to support instruction for citing text evidence. First, the district’s 3rd - 6th grade informative writing rubric references the use of text evidence:
SBAC’s 6th grade Practice Test Scoring Guide explains the rubric:
The exemplar provides specific language:
Preparing students to support their writing with facts from the text can be a challenging task, and extra support is always appreciated. Sentence stems, as highlighted in the exemplar above, are helpful for students to frame their thoughts while referencing the text. One Lewis & Clark teacher found a resource that provided a variety of sentence stems to display in the classroom. With this goal in mind, I have recreated a few options that can be shared, printed, and posted as an anchor chart. Here are some choices. If you like your poster to be large enough to see across the room, you may prefer that each sentence stem appears on its own 8.5x11 piece of paper:  One sentence stem per printed page If you prefer one large poster, then this option can be sent to Graphix to be enlarged to your choice of size: 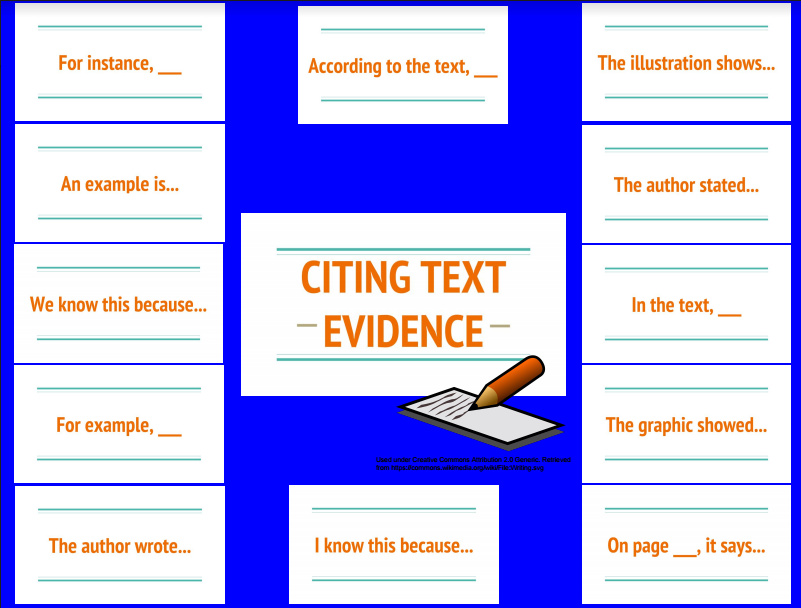 One poster
These are already in PDF form, so they should be print-center ready. Hopefully, this will be a valuable resource to support your writing instruction. |
AuthorAs an instructional coach for technology, I get the pleasure of working with 1 preschool and 15 elementary schools to support integration of technology with classroom instruction. Archives
August 2020
Categories |

 RSS Feed